Showing posts with label Everyday Life. Show all posts

Tuesday, May 21, 2013

7 Layer Dip Roll-Ups

 
One of the things I couldn't escape from this summer, aside from the heat, is my kids' big appetite. They are in the house a lot, and so it would seem that I am always in the kitchen cooking up a storm. I find that it takes up a lot of my time just to feed them; so whenever I can, I try to make a huge batch of something, and keep a good deal of second servings in the fridge. Whenever they are hungry again, like maybe after two hours (I kid you not!), they could just grab one roll and eat!:)

One of my favorite recipes to do whenever I go this big batch route is the 7-Layer Dip Roll-Ups. It keeps well in the fridge for upto 2 days, and it can be eaten cold which works really well for busy moms like me. Tee-hee-hee!

From what the name suggest, it should be made up of 7 ingredients to make up the layers, but I like to keep mine extra busy so the more the merrier works for me.:)
7-Layer Dip Roll-Ups
500 grams ground beef
one pack of Taco mix (I use Mc Cormick)
one head of lettuce, shredded
1 can refried beans
3-4 cups shredded Cheddar-Monterey Jack cheese blend
1 container sour cream
1 cup guacamole (if I am out of time I just put in sliced avocados drizzled with calamansi and salt)
1 can diced tomatoes, drained of juices
a few tablespoons of black olives, chopped
1/2 cup chopped green pepper

1. In a large skillet, brown ground beef, and add taco mix. set aside to cool to room temperature.
2. Spread the ground beef into the bottom of a 9x13 inch serving tray.  
3.  Layer in no particular order: beans, sour cream,guacamole/sliced avocados, diced tomatoes, olives, green pepper
 
 
4. Sprinkle with a generous topping of cheese. And enjoy!

You can serve this dish immediately with nacho chips, like how the Phenomenal Papa likes it; or refrigerate it over night and serve cold like a salad. If you are making this as a roll-up, spread a thin layer of the 7-layer mixture onto each tortilla. Roll up each tortilla, and wrap with aluminum foil to keep the rolls tucked in.  Keeps in the fridge for upto 2 days.


Makes for easy grab and go snacks for the kids to eat in the car when we are in a hurry, too!


Thanks for reading "Our Phenomenal Life." If you subscribe to the blog via RSS feed or via email, you'll get new posts sent straight to you, for free!  Like this post? Subscribe here.
Share

Tuesday, May 14, 2013

Phenomenal Tip: Eco-bags and Grocery Shopping

There are new things coming up for this blog. And in preparation for the exciting times ahead, the blog will be moving to a new home!  While I will still be writing about our phenomenal life, it will now have a new name. 

From now on, I will be doing all of my posting at the phenomenal mama


I hope you could all bookmark the new site and follow me there!


I will still be keeping this blog open so you can read all of my old posts.  But you won't miss a thing with the new blog as it will have all of the old posts, as well. 

* * * * *


The city where I live in has implemented the Plastic Bag Reduction Ordinance since September of 2012.  All business establishments are instructed to encourage the use reusable bags instead of plastic bags.  As stipulated, the city shall be imposing a  fee of P2 to consumers who insist on using plastic bags. 

It took me some time to get used to doing my grocery shopping using eco-bags.  There were days then when I had to ask the bagger to put everything in a box for me because I forgot my eco-bags at home. In the early days of using eco-bags, one of the problems I encountered was how the bagger would just dump everything I bought in the 2 large reusable bags that I brought along, without any regard for grouping items together.  Thus, the toiletries would be mixed with the pantry items, cleaning supplies and vegetables.  This makes packing away at home a major headache also, since everything is topsy-turvy.  I just couldn't stand the disorderly way of bagging that I have since always placed 5 reusable bags in all of the cars so I am never caught empty handed, just in case grocery shopping is an errand I have to do for the day.
 
My MO as soon as I step in the grocery is to place five eco-bags inside my cart: 1.  fruits and vegetables; 2.  dry goods (pasta, bread, dairy, and other pantry items); 3.  toiletries and personal effects; 4.  cleaning essentials (laundry detergent, etc); 5.  frozen meats.  As I start to shop, I place the items in the corresponding eco-bag.

When the time comes for me to pay at the counter, I simply just load the 5 bags onto the counter and inform the cashier and bagger to return all the items to the bag where they came from.   This new system has saved me from putting each and every single item onto the counter.  Whereas before, I would go back and forth between my cart and the counter multiple times to ferry each grocery item, I now only have to do that in the same number of times as I have reusable bags.  Not only have I put order in the bagging of my groceries, I have also saved my back! :)
 

I have a dedicated bag for frozen meat, which is washed after every use. Just to make sure that the meat drippings and food bacteria from raw meat do not contaminate other surfaces.  If we are not careful, these reusable bags could be a cause for bacteria to transfer from the grocery cart to our kitchen and pantry.

And because I have this new system, grocery shopping is now tolerable... slightly therapeutic, even.:)  Sharing a photo which I posted earlier in my Instagram account.   Belated Happy Mother's Day to all the moms!


Excuse the dressy outfit, I just came from a blogger event.  Such is the life of a mom!


Thanks for reading "Our Phenomenal Life." If you subscribe to the blog via RSS feed or via email, you'll get new posts sent straight to you, for free!  Like this post? Subscribe here.
Share

Tuesday, April 9, 2013

Phenomenal Tip: DIY Light Switch Dress-Up with Washi Tape

My blog has moved.  Please read more post at the phenomenal mama.   I hope you follow me there to read NEW posts!

There’s something about simple projects that makes me really happy! I have purchased several rolls of washi tapes the past month, and they've all just been sitting idly.  I intend to do some crafts with the kiddos using washi tape, but since we have not gotten around to agreeing on what to do yet, I just went on ahead and got crafty yesterday afternoon - by myself!  

Oh how fun it was to just have some time to do crafts by myself!  When it comes to crafting, I usually supervise the 2 younger kids, so I do not technically do crafts, instead I watch over them as they do the project.  This is one fun project to do when you're one crafty momma who doesn't have a lot of free time on your hands.

Doing this lightswitch dress-up with washi tape took me less than 5 minutes, from taking off the switch plate to finally putting it back up.  Really!  It is that easy.  The only materials you need are:  washi tape and scissors.

1.  Remove plates from the wall  using a metal spatula or scissors.

2.  Choose washi tape to match the theme of the room.  The girls' room is painted a combination of citron and aquamarine.  So I chose my teal colored washi tape for this project.

3.   Make sure to apply tapes in straight line.
4.  In addition, make sure the patterns are lined up against each other.
5.  Cut tape with scissors when you reach the ends and tuck it under the back of the plate.
 

6.  When you reach the corners, simply cut along the edge.

7.  Then tuck one part in.

8.  The other remaining part, you cut diagonally before you tuck in. 
9.  Makes for a clean finish!
10.  Put back plates.  Step back and admire your handiwork!  
 

You can view more washi-taped light switches right here


Thanks for reading "Our Phenomenal Life." If you subscribe to the blog via RSS feed or via email, you'll get new posts sent straight to you, for free!  Like this post? Subscribe here.
Share

Tuesday, February 26, 2013

What's In My Cart: My Favorite Pancake Mix

There are new things coming up for this blog. And in preparation for the exciting times ahead, the blog will be moving to a new home!  While I will still be writing about our phenomenal life, it will now have a new name. 

From now on, I will be doing all of my posting at The Phenomenal Mama


I hope you could all bookmark the new site and follow me there!


I will still be keeping this blog open so you can read all of my old posts.  But you won't miss a thing with the new blog as it will have all of the old posts, as well. 

* * * * *
 
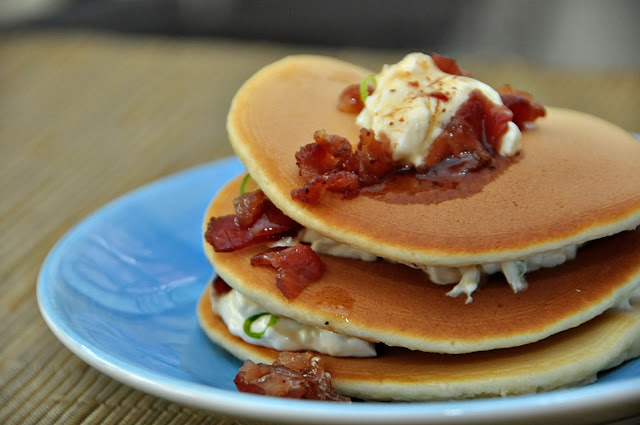
One of my family's favorite breakfast food is pancakes. They love it when it is piled this high and layered with maple syrup, whipped cream cheese, and bacon.  Scrumptious!
There is no shame in admitting that I use a pancake mix.  When I prepare breakfast, time is usually of the essence, especially if the family want to sit down and eat together on the table before C leaves for the office.  With a pancake mix, I just add egg, water and oil, and pancakes are served in no time. 

I have tried almost all the pancake mixes available in the market.  For a long time, I've been a loyal Pillsbury user, and then I shifted to Magnolia Pancake Mix.  I prefer to add my own eggs so I do not buy the one-step pancake mix, where all you have to add is water.  Between the two brands, my kids like Magnolia better, but I found it a bit too sweet for my taste.
We have tried the imported mixes like Betty Crocker and Krusteaz, but we did not find the flavor and texture outstanding; plus the gigantic boxes they came in made storing them in the pantry a hassle. 


After testing almost all the brands available, our family have found our favorite: MAYA Original Hotcake Mix.  As they claim in the package, it is really fluffy and tasty.  The 500-gram box comes with 2 plastic packets inside, but we are a family of big eaters so the entire box is just right for my family of five, with no leftovers.

 
And because the bacon bits really did make me happy today, here's my recipe for the Pancakes with Bacon, Whipped Cream Cheese, and Maple Syrup
  • Pancake mix
  • bacon, cut up to bits
  • 4 ozs. cream cheese, cubed and at room temperature
  • 2 tbsps all purpose cream
  • maple syrup, or if not available from your grocery, any pancake syrup
{Pancakes:}
1.follow package directions

{Bacon Bits:}
1.Cook bacon bits in a non-stick pan without putting oil.  Cook until the bacon has rendered its own fat and the bacon bits are nicely brown.
2.Drain oil, and put on kitchen towels to take out excess oil 
3.Let cool.

{Whipped Cream Cheese}
1.Whisk together cream cheese and cream until light and airy.    

Assemble in layers and enjoy! 

Thanks for reading "Our Phenomenal Life." If you subscribe to the blog via RSS feed or via email, you'll get new posts sent straight to you, for free!  Like this post? Subscribe here.
Share

Tuesday, February 19, 2013

The Cheese Steak Shop Food Truck


C and I are great fans of The Food Network's The Great Food Truck Race hosted by Tyler Florence.   We've always wondered how Manila would welcome gourmet food trucks.  Mobile food peddlers who sell their wares via push carts are no stranger to our streets, but we've always wondered if food trucks would hit it big in Manila.

Last December, when my family was traveling along Ortigas Ave., we saw this huge food truck parked at the complex of City Center (between Madison and Roosevelt sts.).  We knew we had to do a u-turn to get to the other side of the road where this big red truck is.
The Cheese Steak Shop is an original franchise from the U.S. Cheese Steak Shop that is famous all-over California.   The Cheese Steak Shop Food Trucks are now roaming the streets of Manila, bringing the taste of authentic Philly cheese steaks to almost every corner of Manila. I have no idea how many food truck they have; but, this food truck has been in the same spot since December of last year.  


Our server boasts that almost all of the sandwich's ingredients are all imported from the U.S. commissary.  And even the bread for the famous hoagie is imported from Amoroso's Bakery from Philadelphia.
We ordered the 7" classic philly cheese steak, King of Philly, and Italian hoagie, plus sides of onion rings and garlic fries.  Sorry no food photos aside from the one of the fries below.  The sandwiches were ginormous, and eating them in the car was a feat unto itself.  Taking photos in the car was an impossibility.  We ate all the sandwiches in the car - drips and food spills, notwithstanding.  Yeah, family of gluttons.:)


I found it a bit pricey.  But it really tasted soo good... the steak,bread, and fries, it makes it all totally worth it.  We will be having some more again very soon!


The Cheese Steak Shop Manila has two branches, located at 140 Amorsolo St. Legaspi Village, Makati and The Fort Strip, Bonifacio Global City, Taguig.  The food truck goes around so it might not be at the City Center in Ortigas by the time you are reading this.

Thanks for reading "Our Phenomenal Life." If you subscribe to the blog via RSS feed or via email, you'll get new posts sent straight to you, for free!  Like this post? Subscribe here.
Share

Thursday, January 31, 2013

Phenomenal Tip: Ways to Re-Purpose Your Child's Old Crib

I have long donated all my maternity clothes; my baby stroller and car seats have been given away as well; newborn onesies and booties have found new owners, too.  I've given them all away since I don't have any more plans to get pregnant - ever again. (saying this with fingers crossed... in both hands.  hahaha!)

If you are lucky enough to have managed to hold on to your crib and crib mattress, I found several photos that show the many ways on how to repurpose old cribs and mattresses.  The projects look so dreamy, you'll be tempted to make one yourself. 

Here is the crib re-purposed into a toddler arts and crafts table.  Just take out one side of the rail, add some chairs, hang some supplies, and your kids now have their very own crafts center.  I wished I had seen this earlier, when my kids were younger and easily impressed.  This is a really efficient and cheap way to repurpose the crib.  No additional hardware or carpentry works necessary. 
It could also just be repurposed into a simple toddler study desk... because good study habits are easier taught when kids are younger.  I love the chalkboard tabletop, where kids can doodle all they want without the parents having to worry about the walls.


The photo below shows a grown-up take on the repurposed crib. I would love to have one like this. 

Cribs can also be made into a love seat, with a few carpentry works required.  The crib matress also doubles as cushion. 


Love the "princess and the pea"  look of this multi foam sofa.  Perfect for a little girl's playroom.
with a few modifications, the crib frame can even be a hanging daybed

Should you go ahead and convert the crib into a toddler desk, the crib mattress is not a lost cause as it can also be used alone   As you can see, it easily converts into a two-seater daybed.  

This one looks right at home in a Japanese minimalist home


And even that crib bumper pad, can be repurposed into a bench cushion.  Just cut the bumper pad in half and put the two halves alongside each other and tie together.

I bet I have you looking for that old crib and mattress.:)

*double click on the photos for the source
Thanks for reading "Our Phenomenal Life." If you subscribe to the blog via RSS feed or via email, you'll get new posts sent straight to you, for free!  Like this post? Subscribe here.
Share

Tuesday, January 22, 2013

Posh Nails Magallanes

My blog has moved.  Please read more post at the phenomenal mama.   I hope you follow me there to read NEW posts!

After all the last minute shopping for gifts, meeting up with friends and family reunions that I did last December, it was really such a treat for me to experience the pampering treatment at Posh Nails Hand & Foot Spa - Magallanes

When I entered the spa, I immediately felt relaxed for it was painted in soothing shades of of white, pink and lilac. The place looks so feminine and comfortable, especially with its soft couches and plush pillows.  The chandelier at the center of the room also gave the room an added touch of fancy.

I just love the quatrefoil pattern on the divider - certainly added to the chicness.


"Posh Nails Magallanes offers ultra luxurious pampering packages for both hands and feet. Among the most in-demand services include the hand spa, hand and arm scrub, foot scrub, foot and leg mask, foot spa, reflexology, Posh spoiling, Basic Refresh, Green Tea pedicure, Coffee pedicure, eyelash extension, Paraffin dip, nail art and waxing.
Posh Nails is the first spa chain in the Philippines to offer themed manicures and pedicures such as Green Tea, Coffee, Chocolate lovers, Margarita, Cremee Brulee and Citrus. Themed manicures and pedicures differ for each month to keep clients excited and up to date with nail salon services all across the globe. Posh Nails Magallanes also offers cocktail drinks, coffee, tea, hot cocoa along with the themed service."

The first thing I noticed as soon as I took me seat on the couch, was how immaculately clean the place was.  My attendant made sure to sanitize her hands before she started my treatment.  She said that all the instruments were sterilized with a disinfectant after every use.   She also shared that should you have the desire for instant pampering, and finding yourself dressed inappropriately (read: skinny jeans), Posh Nails Magallanes also offers the use of shorts and robes so you can avail of their services comfortably. The staff of Posh Nails Magallanes are very friendly and well-trained.  My attendant made my experience even more comfortable by offering a robe and drinks.  

After washing and soaking my feet for a few minutes, my attendant rubbed a mixture which looked and felt like a brown sugar scrub.


Once it was all washed off, she began to apply this peppermint mask.  


I had the hand and nail treatment, so I felt like a princess for close to an hour.  Thanks so much Posh Nails Magallanes for this luxurious treat!

The nail spa offers an all imported nail polish selection.

Check out the affordable rates below!

Like Posh Nails Hand & Foot Spa -Magallanes on Facebook

Posh Nails Hand & Foot Spa -Magallanes
3/F Unit 308 The Gateway Center, 
Paseo De Magallanes, Magallanes Village, 
Makati
Phone (02) 703 6517
Hours Mon - Sun: 10:00 am - 8:00 pm


Thanks for reading "Our Phenomenal Life." If you subscribe to the blog via RSS feed or via email, you'll get new posts sent straight to you, for free!  Like this post? Subscribe here.
Share
Related Posts with Thumbnails